Friday, April 29, 2011

Friday Grab Bag

Time again for a small collection of items that really don't call for their own blog.

Corn


My sister-in-law teases me for my 6 minute method but my corn always comes out perfect for my taste. Boil water. Add salt. Insert shucked ears of corn. Return to boil and time for 6 minutes. Remove, slather with butter and eat. Perfect every time.

Country Potatoes


What to do with leftover baked potatoes? Cut 'em into chunks. Heat a couple of tablespoons of butter and/or oil in a skillet over medium heat. Toss the chunks in the butter/oil to coat, season with salt, pepper and thyme, cook until brown and crusty. Turn the potato pieces and repeat the process until all sides are brown.

Pigs in Blankets


There are several sausage preparations called pigs in blankets and this is one of mine. Roll hot dogs up in corn tortillas and secure with a toothpick. Heat 1/4" of oil over high heat in a skillet. Cook hot dogs in oil, turning occasionally so that all sides are crisp. Remove to a draining rig and serve. I use an overturned cooling rack on paper towels. Serve with your favorite hot dog condiment but guacamole is awesome.

Pie Crust Cookies


This is a great food memory from my childhood. On pie baking day, cut the leftover trimmings of pie dough into cookie sized pieces. Sprinkle with sugar and cinnamon. Bake on a cookie sheet at 350°F until golden brown and delicious. What a treat!


Have a great weekend!

Shrimp13

Thursday, April 28, 2011

Umbelliferae Braise

I picked up some parsnips and fennel at the store to play with this week. I was going to do 2 different dishes but last night inspiration struck. I checked Field Guide to Produce: How to Identify, Select, and Prepare Virtually Every Fruit and Vegetable at the Market for flavor affinities. Parsnip and fennel share orange. They are also both members of the carrot family, Umbelliferae.

I had oranges and, grabbing them from the fridge, I noticed carrots, also members of the carrot family. Therefore I concocted an;

Umbelliferae Braise


2 tablespoons olive oil
3 fennel bulbs, quartered (fronds reserved)
4 parsnips, peeled
3 carrots, peeled
2 tablespoons reserved fennel fronds, chopped fine
2 oranges, the zest of 1 and the juice of both
salt & pepper

Heat the oil in a large skillet or saute pan over medium high to high heat. Add the fennel bulbs, carrots and parsnips.


Cook until browning and caramelized on all sides (it will smell wonderful).

Remove the carrots and parsnips to a bowl as the fennel will take longer to cook.


Add the orange juice and an equal amount of water, the fennel fronds, orange zest and salt & pepper to taste.

Reduce heat to medium/medium low, cover and cook for 10 minutes. Reintroduce the parsnips and carrots, cover and cook for 15 minutes more.

Remove veggies to a plate and pour cooking liquid over them. I suppose one could make a sauce by reducing the liquid over high heat and adding butter off heat. But I did not.

Any of these veggies could have been omitted and it would have still worked. Other possible additions would be celery or parsley root (to keep it Umbelliferae).


The flavors of all of these veggies are very herbal in very different and complimentary ways. I was very happy with how this came out.

Shrimp13

Wednesday, April 27, 2011

Vaca Frita

This was inspired by an Alex Garcia recipe from the Food Network show, Nuevo Latino. He calls for boiling flank or skirt steak until tender, shredding the meat and then frying it in hot oil. I like to do mine with leftover pot roast (I always use chuck). I also keep mine very simple seasoning-wise (salt) and I generally serve it alongside tortillas with salsa, limes, onions, cilantro and tomatoes as garnish choices.

Vaca Frita means fried cow in Spanish.

Vaca Frita


A couple of pounds of leftover pot roast (see link for original boiled flank steak method)
1/8 cup oil
salt to taste

Shred pot roast like so;


Heat oil over high heat in a large skillet. Ad beef and spread out in an even layer. Season with salt.


Cook without disturbing until beef is crusty and caramelized. Turn beef and repeat on other side.


Serve with tortillas and your favorite Latin American accouterments.

Shrimp13

Tuesday, April 26, 2011

Roasted Bacon Wrapped Pork Loin

I love pork tenderloin and pork shoulder and feel as though I can turn out decent food with either. Less so with the boneless loin. More often than not, unbrined it comes out dry and brined it comes out squeaky and, though flavorful, that flavor is mostly seasoned water, not porky goodness.

Inspired by my new Blogger.com friend The Chef en Amateur by his smoked, bacon wrapped pork loin recipe, I attempted a simple weeknight bacon wrapped pork loin using the roast boneless pork loin method from Timing Is Everything, one of my kitchen bibles.

The bacon would add the salt and fat for moisture and flavor and, unbrined, it would be full of it's own porky flavor. The relatively quick roasting method would make it suitable for a weeknight meal. Here's what went down;

Roasted Bacon Wrapped Pork Loin


1 3 pound boneless pork loin
half a package thinly slice smoky bacon

Preheat oven to 450 degrees F. Wrap pork with the bacon so that the weight of the pork holds the bacon strips together under the roast on a baking pan.

Place in oven and cook for 10 minutes. Reduce the heat to 250 degrees F and cook until done to your liking. Timing is Everything recommends 20 - 22 minutes a pound.

Remove from oven and let rest 15 minutes before slicing.


The verdict? It smelled simply delightful while cooking. The meat was moist, smoky and flavorful but...as you can see, the bacon didn't really crisp up. I could have held the bacon to the roast with skewers and browned it on all sides before roasting but then it falls outside the realm of simple and weeknight. I suppose I'll have to remove it from that category or try a longer lower method or a higher hotter method.

Shrimp13


Friday, April 22, 2011

Odds and Ends

Black Radishes

Still Life with Cucumber

In my experimenting with black radishes I also did a saute with parsnips and a sandwich of thinly sliced black radish and mayo on whole grain bread.

Radish and Mayo on Wheat

The sandwich was surprisingly creamy and satisfying.

The saute was less delightful as I have a heck of a time getting turnips (and therefore black radishes as they're similar) to ever get done in a saute.


They always end up with too much crunch (read, they're hard) when the rest of the stuff is cooked. This one was no different.

For the record, I combined peeled, chopped black radish, peeled and chopped parsnips, chopped onion and minced garlic and sauteed until everything was cooked except for the radish. I seasoned with salt and pepper and choked it down as punishment for my failure. I kid, it really wasn't that bad.

Next time I use black radishes it will definitely be part of a root bake.

Pasta Primavera


Also this week I threw together this pasta primavera with asparagus and yellow summer squash that was more to my liking.

While the pasta water was heating I tossed the veggies in garlic, olive oil and Italian herbs, spread on a baking sheet and roasted in a 400°F oven.


When the  pasta was cooked, I drained it and tossed in the veggies and topped with grated cheese. Yum.

Have a great weekend!

Shrimp13

Thursday, April 21, 2011

Pasta Risotto

This is apparently the third in a series about risotto, the second of 2 which are not actually made with rice. The first was barley risotto. I made this one with risi which is the small rice shaped pasta (as opposed to orzo or risoni, "big rice").

The inspiration came from Keys to Good Cooking: A Guide to Making the Best of Foods and Recipes by Harold McGee. To paraphrase as I don't have the book in front of me, he says that to make small pastas creamy, cook them by stirring in wine and stock one ladle full at a time like risotto.

Here's how it worked out;

Pasta Risotto


1 quart or so stock or water seasoned with a bouillon cube at a bare simmer
2 tablespoons olive oil
1 small onion, chopped fine
3 cloves garlic minced
1 cup risi or orzo/risoni pasta
1/2 cup white wine
2 tablespoons butter
1/4 cup grated Parmigiano Reggiano
salt and black pepper to taste

Heat oil in a medium saucepan over medium high heat. At the onions and cook, stirring occasionally, until translucent. Add the garlic and cook, stirring frequently until the garlic is aromatic (less than 30 seconds).


Stir in the pasta. I am not sure whether cooking it for a bit while stirring did anything like it brings out a nutty flavor in rice but I did it anyway.


Add the wine and stir frequently until most of it has evaporated/been soaked up by the pasta. Repeat this step with the stock, a cup at a time.


It took me 3 cups of stock checking for doneness of the pasta before the next addition of stock, about 12 minutes.

When the pasta is done to your liking and the last addition of broth is not too soupy, remove from heat and stir in the butter and the cheese. Again, I am not sure that letting it rest for 5 minutes with the cover on like a traditional risotto does anything for it but I did. Season with salt to taste and plenty of freshly ground black pepper.

It definitely tasted lighter somehow than risotto and pasta-ier (wheatier?). It was a fun experiment which actually started out to be risi e bisi with pasta but I forgot by the end and didn't leave it soupy or add the peas.

Shrimp13

Wednesday, April 20, 2011

Black Radish, Parsnip and Cucumber Salad

On Saturday I picked up some black radishes and parsnips at Sunflower. I knew there had to be something turnip-like I could do with the radishes (as they are a lot like turnips) and I thought perhaps I would roast the parsnips. Maybe they would both end up in a root bake. Then I saw this thread on Chowhound.com and used it in two other ways I hadn't thought of.

This is the first; a salad with some flavor similarities to jicama lime salad but sweeter and creamier.

Black Radish, Parsnip and Cucumber Salad


3 black radishes, peeled and grated
2 parsnips, peeled and grated
1 cucumber, seeded, peeled and grated
1 small onion, chopped
1 teaspoon mayonnaise
the juice of 2 key/Mexican limes
small handful cilantro, chopped
salt and pepper to taste

Mix all of the above in a small mixing bowl and serve. It's that easy.


The result is a sweet, creamy slaw perfect as a side dish for taco night. Leave out the lime and cilantro and replace the mayo with sour cream and you have something more traditional. I could also imagine going heavy on the garlic and replacing the sour cream with yogurt and serving it with moussaka.

Shrimp13

Tuesday, April 19, 2011

Panko Breaded Pork Tenderloin

The tenderest part of the pig is the tenderloin. Well suited for a quick cooking method, it is also exceedingly mild tasting. I like to marinate whole tenderloins and sear them over hot coals and finish them on the cool side of the grill to medium rare or medium. The method below results in a breaded tenderloin medallion suitable for a sandwich or topped with pan gravy (or both).

Panko Breaded Pork Tenderloin


2 whole pork tenderloins
salt and pepper to taste
1 cup or so flour in a pie plate
3 eggs beaten in a pie plate
2 cups panko crumbs...in a pie plate
oil

Cut your tenderloins into medallions about 2 inches thick. Put them individually into a zipper plastic bag.


You can use wax paper or plastic wrap but the zipper bag is strong enough to stand up to the beating of 8 medallions. Plus you get less meat spraying out the sides with 3 sides sealed. Beat them to about 1/2 inch thick. I use a rubber mallet.


Season with salt and pepper and set aside for a moment while you heat your oil.


Your oil should be about 1/4 inch deep in the bottom of a large skillet. On my stove I heat on high until shimmering. Your results will vary depending on the efficiency of your burner.

Dip each pounded medallion in flour, shake off the excess,


then the egg


and then the panko crumbs.


Cook in the oil until golden brown and delicious on the first side.


Carefully turn them over and cook until golden brown and delicious on the other side.


Remove to a draining rig.


Serve when cool enough to eat. I like them on a soft bun with mayo and lettuce and lots of fresh ground black pepper.

Shrimp13

Monday, April 18, 2011

Mexican Rice

This is the quintessential Mexican side dish second only to frijoles. I learned this method from 2 women who had the most impact on my Mexican cooking, my mother-in-law, and Nellie at Taco Tina's.

Mexican Rice


2 tablespoons lard or vegetable oil
1 onion, chopped
3 cloves garlic, minced
2 cups long grain rice
1 cup chunky salsa or canned diced tomatoes, drained
4 cups water
2 teaspoons salt

Heat the lard or oil over medium high heat in a large skillet until shimmering. Add the onions and cook, stirring occasionally until beginning to brown, add the garlic and the rice and continue to cook, stirring occasionally, until it begins to smell nutty.

Stir in the salsa or tomatoes, water and salt.


Increase heat and bring to a boil. Reduce heat to very low, cover and simmer for 25 minutes. Remove from heat and lat rest for 5 minutes, fluff with fork and serve.


Brown rice can be substituted. Increase water to 4 1/2 cups and cooking time to 45 minutes.

Shrimp13

Thursday, April 14, 2011

Brown Rice Spanish Chorizo Pilaf

I am no stranger to Mexican chorizo which is a staple breakfast sausage here in Tucson. I don't know if they still do, but when I moved here, the McDonald's on 22nd had a egg and chorizo McMuffin on the menu.

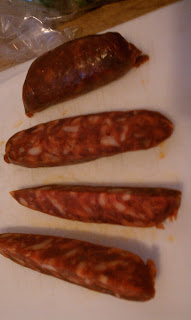
Until recently I had never tried Spanish chorizo. It is a completely different thing. Mexican chorizo is a soft, fresh sausage made from organ meats. It is vinegary and pretty pungent. Spanish chorizo comes in hot and mild and gets it's color and flavor from smoke paprika. Also it is a cured sausage akin to salami.

In it's very not American looking packaging.

I tried it sliced plain and it has an admirable fat content and is very mild (I didn't grab the "hot" one). The rest I used as the flavoring for a pilaf. I almost always cook my rice this way (with the exception of the chorizo).

Another foodstuff that doesn't photograph well (by a hack).

Brown Rice Chorizo Pilaf

1 tablespoon oil
2 small links Spanish chorizo, chopped
1 onion, chopped
2 or 3 cloves garlic, minced
1 cup brown rice
2 1/4 cups water
1 teaspoon salt

Heat oil over medium high heat in a medium saucepan. Add the chorizo and cook, stirring occasionally, until some of the fat has rendered.


Add the onions and cook, stirring occasionally until translucent. Add the garlic and cook, stirring frequently until aromatic (like 15 seconds).


Add the rice and cook, stirring frequently, until the rice begins to brown and smell nutty.


Add the water and salt and bring to a boil. Stir one last time, reduce heat to very low, cover and cook for 45 minutes.

Remove from heat and let rest for 5 minutes. Turn the rice onto a platter and serve.

Shrimp13

Wednesday, April 13, 2011

Fried Squid

Considering that we as a country don't seem to be really big eaters of cephalopods , fried squid or, safer, the Italian "calamari" is a really popular (read ordinary) starter. Less likely would exist cuttlefish fries or octopus poppers (although I bet these too would be delicious).

Squid is cheap and if you don't live on the ocean, the frozen ones are about as good if not better than fresh. It can be sautéd, included in stir fries and paella... Common opinion is that they need to be either quick cooked or long cooked, a minute or an hour, otherwise they can be rubbery.

They are easy to deep fry. I did them two way recently; breaded with breadcrumbs and then when I ran out of breadcrumbs, re-breaded in the flour. Both worked just fine but I preferred the breadcrumbs. As far as bread crumbs go I have breaded with dry (stale), fresh and panko and they all work great in my opinion. You can season your breading materials but I have found that no matter what they will need salt at the end.

Fried Squid


Oil
1 bag frozen shrimp rings and tentacles
1 cup or so flour
3 eggs beaten
2 cups breadcrumbs
Salt

Fill a large cast iron pot 1/2 way or less with oil (of course you could also use a deep fryer) and heat to 350°F.

Meanwhile, set out your plates of flour, eggs and breadcrumbs for breading. Thaw your squid under cold running water in a colander and dry with paper towels.

Dip your squid first in the flour and shake off the excess. Then into the egg and then the bread crumbs. Fry in the hot oil until golden brown and delicious, literally about a minute or so. Remove to a cooling rig. Again I use an overturned cooling rack on paper towels but every family seems to have their own tradition for holding their fried foods.

Enjoy when cool enough to eat.

Shrimp13

Tuesday, April 12, 2011

Stock

Michael Ruhlman in The Elements of Cooking and Ratio (both indispensable texts for the home cook I might add) sings the praises of stock for the home kitchen. It's true that if I have stock at the ready I am much more likely to use it and there are dishes I would rarely make if I didn't.

In "notes on cooking" from The Elements of Cooking, specifically the stock section, Ruhlman writes that if you are going to use stock throughout the week, you can leave it in an open pot on the stove after straining. Simply bring it to boiling daily and taste it as the week progresses for constituency. Throughout the week you can enrich the stock with trimmings.

This is a revelation. I more often than not use seasoned plain water or a bouillon cube when a recipe calls for stock. I avoid canned or aseptically package stock as it is an edible foodlike substance, not an infusion from meats and vegetables. The best part about store-bought stock is the MSG for which you might as well use bouillon. So now I can conveniently use fresh home made stock for recipes that call for it.

More importantly are the recipes upon whose success hinges stock. I am much more likely to make soup or risotto if I have a pot of stock begging to be used.


When I make stock I use meaty chicken carcasses (or turkey if it's that time of year) and I have used meaty beef bones which was tasty for us and Jack Jack the dog.

My basic method although you would do well to read Ruhlman on the subject;

1 chicken carcass
1 bay leaf
a few sprigs of thyme
8 or so pepper corns
3 or so garlic cloves
a couple of onions quartered
a few carrot in large chunks
a couple of celery stalks also in large chunks
any other appropriate veggies that might be laying around

Cover the chicken carcass with water in a large pot and bring to just below a simmer, 180 - 190°F. Add the bay leaf, peppercorns and thyme. Allow the chicken bones to infuse the water with their chickeny goodness for 2 to 3 hours skimming any foam that appears on the top.

Add your aromatic veggies (garlic, onion, carrot, celery etc.) and cook this way for an additional hour.

If you are doing a vegetable stock, you only need to do this last step. An hour is long enough to leach the tasty goodness from the veggies.

Shrimp13